The following will provide a short introduction to some of the new functionalities in Resource Central.
More information can be found in the different user guides for Resource Central.
New resource and license types
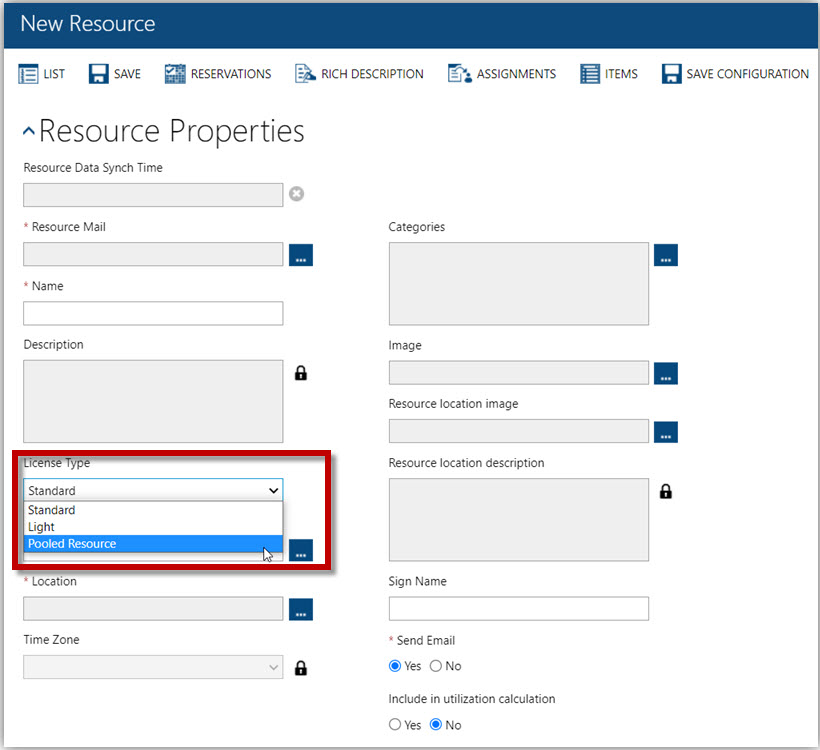
We are introducing a new resource type called ‘Pooled Resource’, so we now have 3 resource types.
- Standard resources
- Light resources
- Pooled Resources
A Pooled Resource is typically used for a group of desks or equipment, where it is not needed to know whether you book desk 1, 2 or 3. Just that you have the right to book any one of the desks in that pool.
The Pooled Resource will be connected to one Exchange calendar and will be listed once in ResourceFinder, but with a capacity of the total number of desks.
E.g., a group of desks ‘Desk Group 1’ has 20 desks, so it will show up as ‘Desk Group 1’ with capacity 20, in ResourceFinder. If I book this resource, a desk will be available for me – not a specific desk, but one of the 20 desks. I will then have to pick a desk when I arrive at the office.
If you invite 3 of my team members as attendees of the same booking, you will reserve 4 desks at the same time.
When all 20 desks are booked, ‘Desk Group 1’ will show as busy, just like a meeting room that is booked.
Setting up a Pooled Resource requires some specific configurations on the Exchange resource. Please refer to our Resource Central Admin Guide for details of this configuration.
Please also note that Pooled Resources require new licenses and there are no changes to the way standard and light resources work.
Resources can be booked as 'Free'
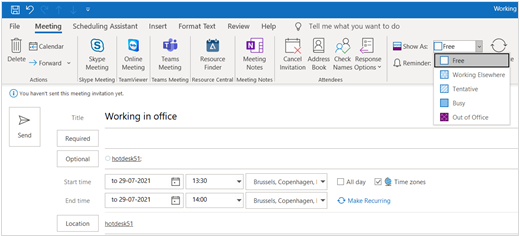
It is now possible to book a resource and have the Busystatus set to ‘Free’ in your own appointment. Previously this would not book the resource in Resource Central.
This is especially useful when booking a single desk or a pooled resource. In that case you would like your own calendar to be free, so others will still be able to see you as available. While in your calendar you can still see your resource booking.
Location utilization calculation
As a part of ‘Getting back to office’ we have implemented a new feature to limit the utilization of your existing resources. When using this feature, you can set a limit on how many of your resources can be booked for a given location. The percentages are set on location level and apply to all resource types, including the new Pooled Resource type.
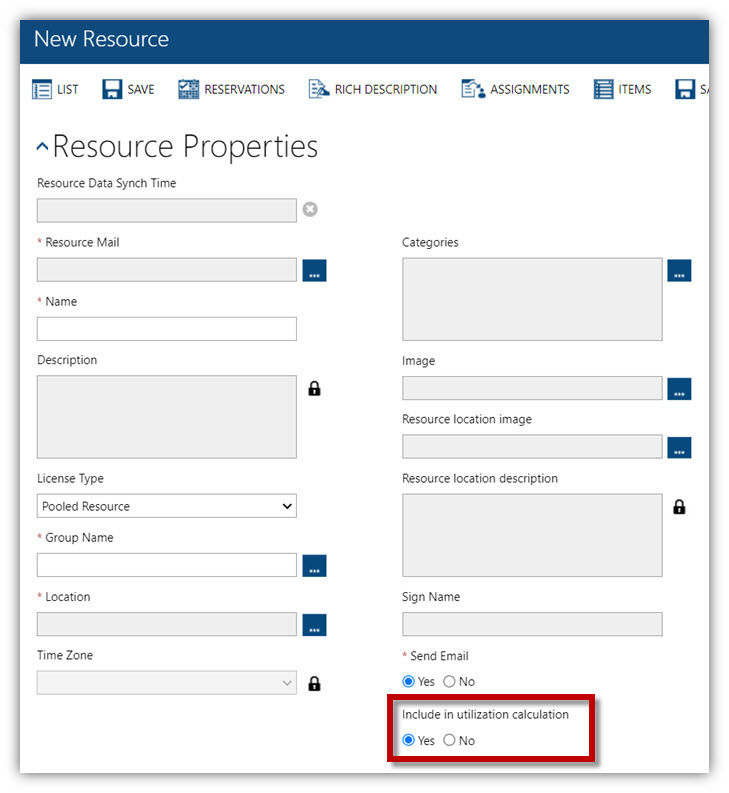
To include a resource in the calculation, you need to set the ‘Include in utilization calculation’ to yes in the resource details.
When used on a standard or light resource, the capacity of the resource will automatically be set to 1. This feature is therefore not intended to be used for Rooms or other resources except Pooled Resources, where you need the capacity to be bigger than 1.
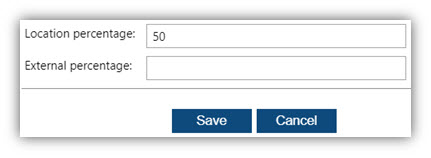
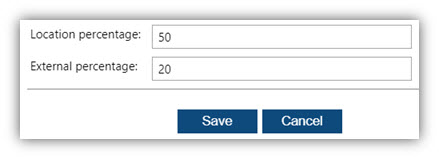
The utilization calculation works with a location percentage and an external percentage.
Location percentage
The Location percentage can be used alone or in association with the External percentage.
E.g., if you want to reserve 50% of the desks for employees, who are always in the office and make the remaining 50% available for booking by employees that shift between office and home office and therefore do not need a fixed office desk.
When used alone (External percentage is left blank), the Location percentage will control how many of your light resources or Pooled Resources can be booked.
The utilization calculation for a location is done per Pooled Resource while Standard/Light are calculated as a total group from which the percentages are deduced to give the available number of resources for that location.
Example 1 - Booking a Pooled Resource:
Conditions:
- Location percentage is set to 50.
- 1 Pooled Resources with capacity of 10
Scenario:
Organizer A wants to book Desk Pool 1 and will in Resource Finder see the resource ‘Desk Pool 1’ showing a capacity of 5 (50% of 10).
Example 2 – Booking Light Resources:
Conditions:
- Location percentage is set to 50.
- 8 Light Resources
Scenario:
Organizer A wants to book 5 light and will in Resource Finder see all the Light Resources with capacity of 1.
Organizer A can then select up to 4 (50% of 8) and after that prevented from selecting more resources.
External percentage
The external percentage is used if you want to reserve x percent of the resources for certain employees.
E.g., if you have multiple sites with employees going back and forth between the locations, then you can set up x percent of the desks to be reserved in each site for employees visiting this site on a regular basis. This will give this “visiting” employees better opportunity to find available seating as the employees normally working at the site cannot take up all available seats.
Or if employees have default workplace on one floor, seats can be reserved for them on other floors in case they cannot find an available seat on their default floor and they must go to the office.
The calculation of the external utilization is based on where the organizer and the resource are located. This is controlled through the Active Directory where AD groups are mapped on users and resources for later comparison in Resource Finder. Please refer to our Resource Central Admin Guide for more details on the feature.
You can configure when the resources are freed for all employees after a number of days. So, if your booking start date does not exceed the number of days, then the resource can be booked by all.
If it is longer, the x percentage of the resources are reserved.
This setting is controlled by the parameter ResourceFinder.PreReservedDays.
Example 3 - Booking a Pooled Resource:
Conditions:
- Location percentage = 50
- External percentage = 20
- Organizer A is in the AD-Group ‘IT’.
- Organizer B is not in the AD-Group ‘IT’.
- The resource ‘Desk Pool 1’ has a capacity of 10 and is in the AD-Group ‘IT’.
- The parameter ResourceFinder.PreReservedDays is set to 3.
- ‘Today’ is the 10th of April.
Scenario:
- Organizer A is creating a booking for 20th of April.
The resource ‘Desk Pool 1’ will show a capacity of 5 (50% of 10) because ‘Organizer A’ is in the same AD-Group as the resource.
- Organizer B is creating a booking for 20th of April.
The resource ‘Desk Pool 1’ will show a capacity of 2 (20% of 10) because ‘Organizer B’ is not in the same AD-Group as the resource.
Example 4 – Booking a Pooled Resource:
Conditions:
- Location percentage = 50
- External percentage = 20
- ‘Organizer A’ is in the AD-Group ‘IT’.
- ‘Organizer B’ is not in the AD-Group ‘IT’.
- The resource ‘Desk Pool 1’ has a capacity of 10 and is in the AD-Group ‘IT’.
- The parameter ResourceFinder.PreReservedDays is set to 3.
- ‘Today’ is the 10th of April.
Scenario
- Organizer A is creating a booking for 12th of April.
- The resource ‘Desk Pool 1’ will show a capacity of 7 (50%+20% of 10) because Organizer A is in the same AD-Group as the resource and the date of the booking is inside the window defined by the ResourceFinder.PreReservedDays parameter.
Deadline per item
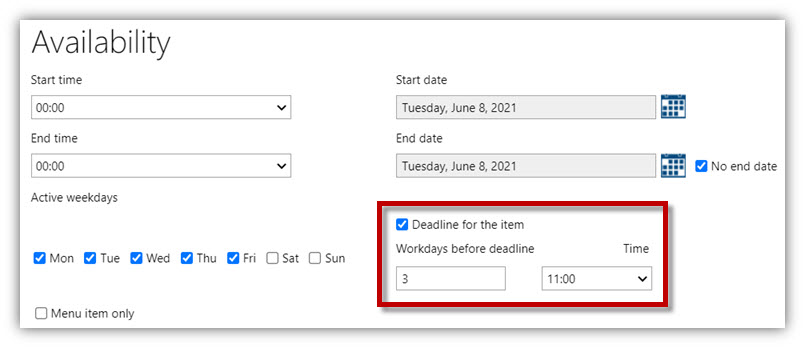
Deadlines can now be configured on each individual item. This supports caterers that have different deadlines on different items, e.g., ‘Lunch’ can have longer deadline than ‘Coffee’.
The deadline is configured with a time of day and a number of workdays. This means you can setup an item that has to be ordered before 11 o’clock, 3 workdays before the meeting.
The deadline can still be configured on a resource level, utilizing the new functionality. This deadline will then apply to all items. If any of the items have a longer deadline than setup on the resource, the deadline for the item will apply.
The ‘Minimum hours’ feature is no longer available. If the feature has been applied, a new deadline will be calculated based on the previous settings.
New floor plan features
Several new floor plan features have found their way into this release.
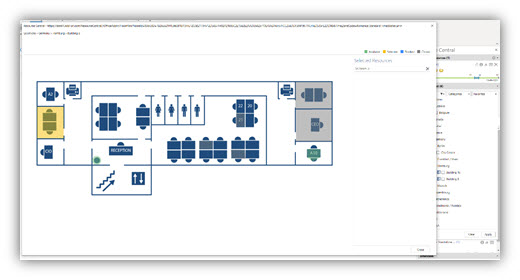
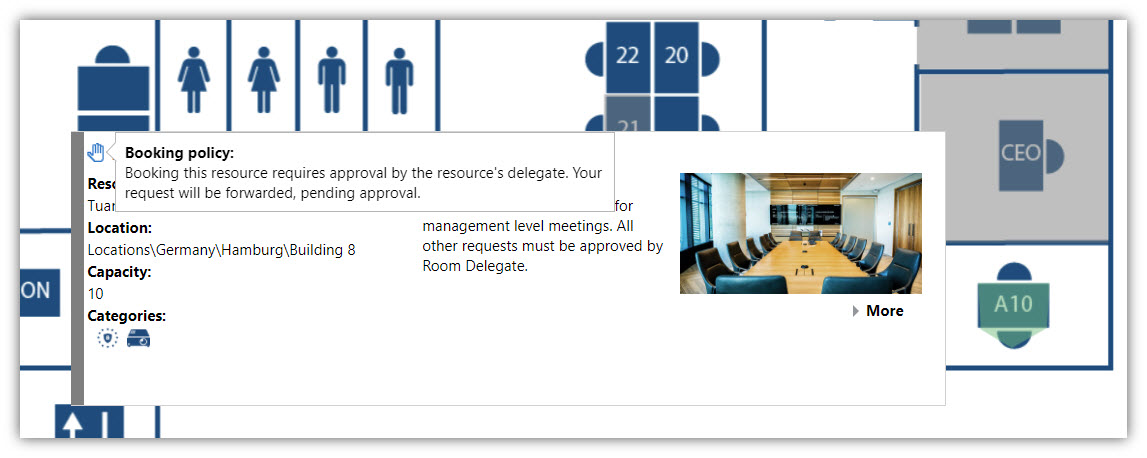
The floor plan is now available in the Outlook Add-in, where it can be found under the Locations filter. Here a floor map icon will be shown, which will take the user to the floor plan of the specific location. From here it is possible to navigate to other locations to find suitable resources to book.
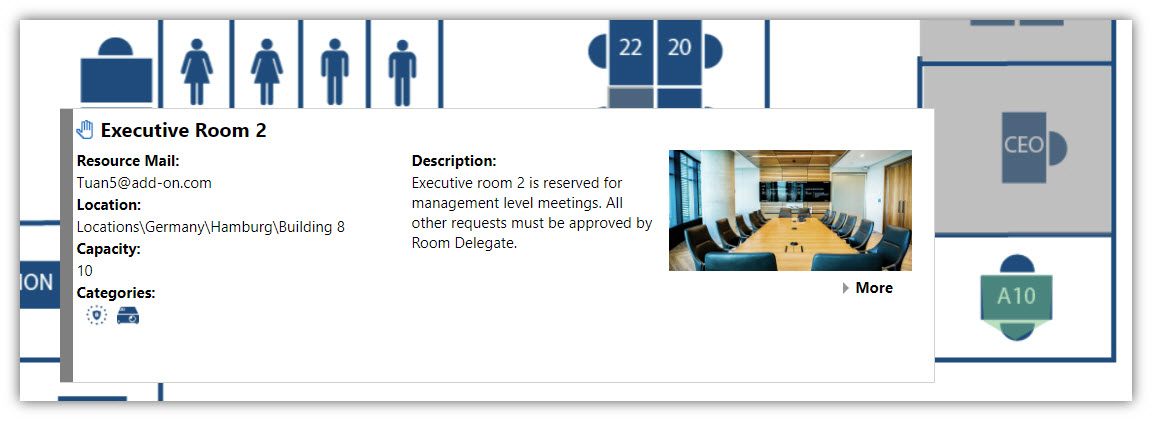
On the floor map it is furthermore possible to see resource details in a new mouse over
The booking policy icons have also been made available, explaining to the users the reasons behind any policy, restricting or limiting their booking of the resources directly on the floor plan.
History
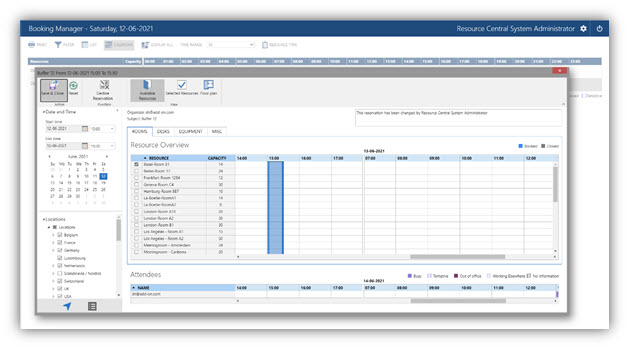
The History feature enables the administrator to track all changes made to a meeting in Outlook/Exchange and see the corresponding impact in Resource Central. The history focuses on the Exchange meeting, so it can have multiple resource reservations, which will give a consistent and full picture of the meeting history in one view. This feature improves the system administrator ability to do troubleshooting when handling support cases from organizers.
In the history, it is also possible to see changes made by others than the organizer e.g., by a Delegate or a Booking Manager.
Important: For this feature and Resource Central 4.2 Service Release 1 to run correctly, it is needed to run the RC Migration tool during the upgrade.
New feature in Booking manager
In Booking Manager, it is now possible to decline resource reservations and thereby free up a room.
This new feature does not require impersonation rights on all user’s calendars, which means that you can use it even if your organization does not allow this permission setting.
Tax receipt feature (Bewirtungsbeleg)
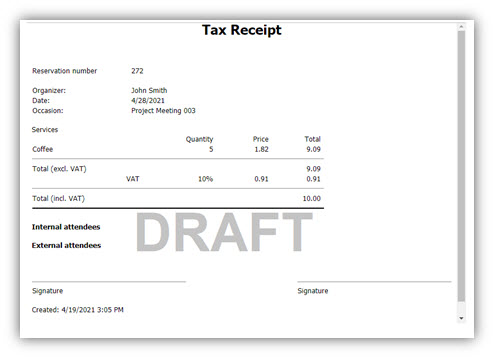
The demand for a tax receipt for the tax authorities has been rising and this feature was created to address that demand. A tax receipt shows what was delivered and contains information that can be used when doing accounting, i.e., totals excl. and incl. VAT, name of participants etc.
The feature provides an acceptance workflow between the service provider and the organizer.
- When the service provider has made the necessary adjustments to the order, he can click ‘Send tax receipt’ in the order overview screen or in the order details.
- The organizer is informed that a tax receipt is ready and is ready for his review and acceptance.
- The organizer can access the tax receipt from a link in the email or from MyMeetings.
In the tax receipt there will be buttons to accept or decline the tax receipt.
If declined the service provider will be notified and can then make the necessary changes and resend the tax receipt.
- When the tax receipt is accepted by the organizer it can be forwarded by the organizer to the finance department or it can be retrieved in Resource Central. This will depend on the procedure in your organization.
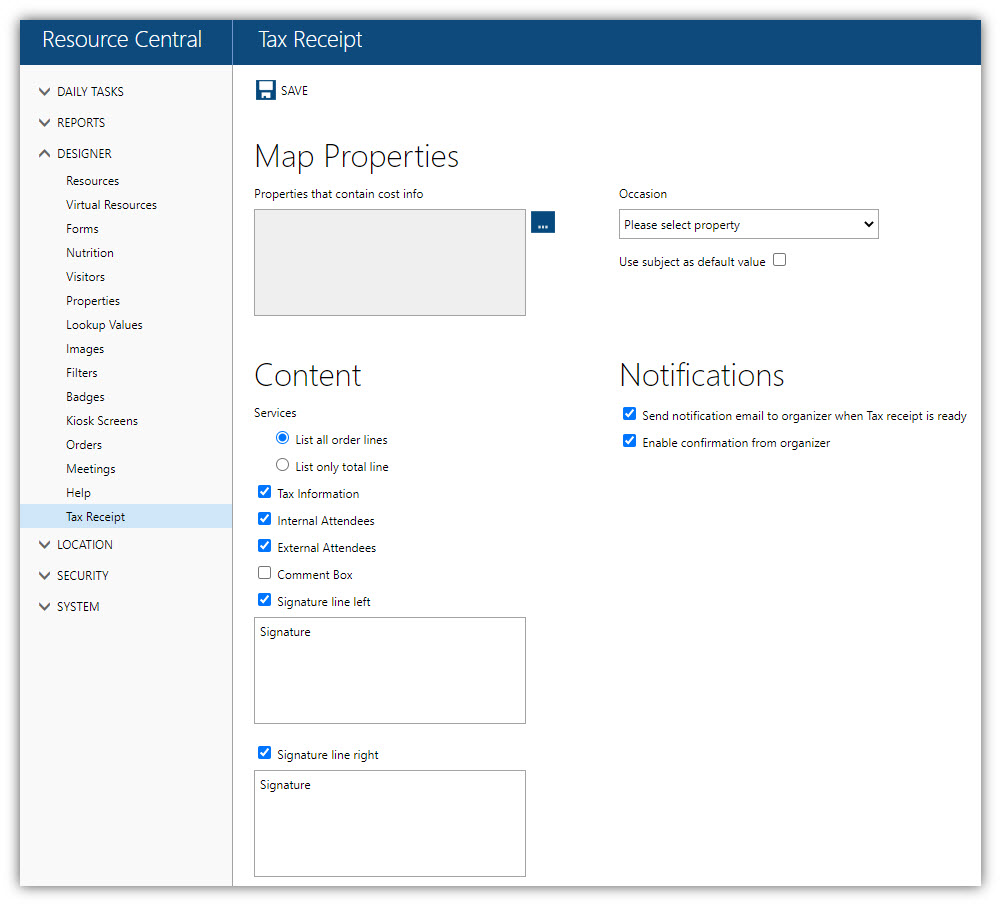
The content of the tax receipt and the acceptance flow is configurable in ‘Tax receipt’ under Designer.
Tax receipt feature is controlled by the parameter TaxReceipt.Enable, the value must be set to 1 to be enabled.
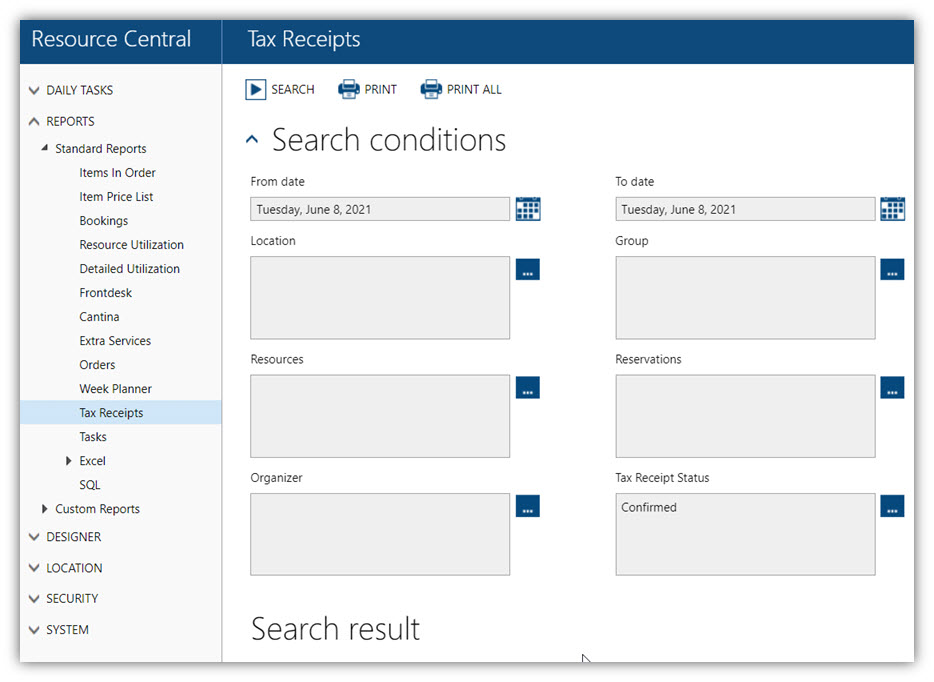
The feature includes a new standard report that enables you to search for tax receipts for specific locations, resources, organizers etc.

Tuan Dinh Cong
Comments